| 일 | 월 | 화 | 수 | 목 | 금 | 토 |
|---|---|---|---|---|---|---|
| 1 | 2 | 3 | 4 | 5 | 6 | 7 |
| 8 | 9 | 10 | 11 | 12 | 13 | 14 |
| 15 | 16 | 17 | 18 | 19 | 20 | 21 |
| 22 | 23 | 24 | 25 | 26 | 27 | 28 |
| 29 | 30 |
- spring security
- 티스토리챌린지
- golang
- Codeup
- 객사오
- 오블완
- MySQL
- GitHub
- Postman
- 클린코드
- JPA
- 스프링
- Spring Boot
- 코드업
- springboot
- 파이썬
- thymeleaf
- 클린 코드
- go
- mariadb
- Git
- 알고리즘
- Python
- java
- Vue.js
- 롬복
- H2 설치
- Spring
- Gradle
- 기초100제
- Today
- Total
nyximos.log
Spring Boot + MySQL + JPA + Thymeleaf 로 CRUD 구현하기 07 글 조회, 링크연결 본문
Spring Boot + MySQL + JPA + Thymeleaf 로 CRUD 구현하기 07 글 조회, 링크연결
nyximos 2022. 8. 26. 21:02Spring Boot + Gradle + MySQL + JPA + Thymeleaf 환경에서 간단한 CRUD 예제를 만들어보자
이번 포스팅에서는 게시물 조회를 구현해보자.
주요 기능
회원가입
로그인
게시글 등록
게시글 수정
게시글 삭제
게시글 조회 (일반 회원 조회수와 운영자 회원 조회수 따로 구분)
게시글 추천
목록 조회와 상세 조회, 페이지 2개가 필요하다.
일단 조회를 어떻게 구현할지 생각해보자.
여러가지 방법이 있을 수 있다.
일반 회원과 운영자 회원의 조회수를 구분해야 한다.
그리고 본인이 쓴 글의 조회수를 조회할 때는 조회수를 증가시키지 않는다.
리스트 화면
글번호, 제목, 등록일시, 일반회원조회수, 운영자 조회수, 작성자명
상세 화면
글번호, 제목, 등록일시, 수정일시, 작성자명, 일반회원조회수, 운영자 조회수, 추천수
리스트 조회
home.html
홈화면에 리스트를 띄우자.
<th:block layout:fragment="content">
  <h1>리스트</h1>
  <table>
    <thead class="thead-light">
      <tr class="text-center">
        <th scope="col">글번호</th>
        <th scope="col">글제목</th>
        <th scope="col">작성시간</th>
        <th scope="col">일반회원 조회수</th>
        <th scope="col">운영자 조회수</th>
        <th scope="col">작성자</th>
      </tr>
    </thead>
    <tbody >
      <tr th:each="p : ${posts}">
        <td scope="row" width="10%">
          <div th:text="${p.id}"></div>
        </td>
        <td scope="row" width="20%">
          <div th:text="${p.title}"></div>
        </td>
        <td scope="row" width="20%">
          <div th:text="${p.createdAt}"></div>
        </td>
        <td scope="row" width="10%">
          <div th:text="${p.userViews}"></div>
        </td>
        <td scope="row" width="10%">
          <div th:text="${p.adminViews}"></div>
        </td>
        <td scope="row" width="20%">
          <div th:text="${p.memberName}"></div>
        </td>
      </tr>
    </tbody>
  </table>
</th:block>
th:each = "변수: ${목록}"
Thymeleaf에서 반복문은 th:each라는 속성을 이용한다.
ListDTO
@Getter
@Setter
@Builder
public class ListDTO {
    private Long id;
    private String title;
    @DateTimeFormat(pattern = "yyyy-MM-dd`T`HH:mm:ss")
    private LocalDateTime createdAt;
    private int userViews;
    private int adminViews;
    private String memberName;
}
BoardService
다음 메소드를 추가해준다.
List<ListDTO> getAll();
BoardServiceImpl
@Override
public List<ListDTO> getAll() {

    List<Board> posts = boardRepository.findAll();
    List<ListDTO> list = new ArrayList<>();


    for (Board post : posts) {
        Member member = post.getMember();

        ListDTO dto = ListDTO.builder()
                .id(post.getId())
                .title(post.getTitle())
                .createdAt(post.getCreatedAt())
                .userViews(post.getUserViews())
                .adminViews(post.getAdminViews())
                .memberName(member.getName())
                .build();

        list.add(dto);
    }

    return list;
}
repository에서 게시글을 다 가져온다.
List<Board> posts = boardRepository.findAll();
DTO를 담을 리스트를 만들어준다.
List<ListDTO> list = new ArrayList<>();
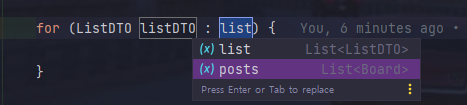
iter 치고 엔터를 누르면 자동 완성 기능을 이용할 수 있다.
빌더 패턴을 사용하여 dto를 생성하고 방금 생성한 List에 담아준다.
for (Board post : posts) {
    Member member = post.getMember();

    ListDTO dto = ListDTO.builder()
            .id(post.getId())
            .title(post.getTitle())
            .createdAt(post.getCreatedAt())
            .userViews(post.getUserViews())
            .adminViews(post.getAdminViews())
            .memberName(member.getName())
            .build();

    list.add(dto);
}
WebController
@Controller
@RequiredArgsConstructor
public class WebController {

    private final BoardServiceImpl boardService;

    @GetMapping("/")
    public String index(Model model) {
        List<ListDTO> posts = boardService.getAll();
        model.addAttribute("posts", posts);
        return "home";
    }

}
Service에서 받아온 dto 리스트를 Model에 담아 넘겨준다.
서버를 켜서 화면을 확인해보자.

상세 조회
detail.html
<!DOCTYPE html>
<html lang="ko"
      xmlns:th="http://www.thymeleaf.org"
      xmlns:layout="http://www.ultraq.net.nz/thymeleaf/layout"
      layout:decorate="~{layout/layout}">
<head th:replace="~{fragment/header::headerFragment(~{::title})}">
    <title th:text="상세"></title>
</head>

<body >
<th:block layout:fragment="content">
    <h1 th:text="${post.title}"></h1>
    <div id="content-box">
        <div>글번호 : <span th:text="${post.id}"></span></div>
        <div>등록 일시 : <span th:text="${post.createdAt}"></span></div>
        <div>수정 일시 : <span th:text="${post.updatedAt}"></span></div>
        <div>작성자 : <span th:text="${post.memberName}"></span></div>
        <div>일반회원 조회수 : <span th:text="${post.userViews}"></span></div>
        <div>운영자 조회수 : <span th:text="${post.adminViews}"></span></div>
        <div>조회수 : <span th:text="${post.likes}"></span></div>
        <div>글 내용</div>
        <div id="line" th:text="${post.content}"></div>
    </div>
    <div>
        <button id="update" type="button">수정</button>
        <button id="remove" type="button">삭제</button>
    </div>
</th:block>

<th:block layout:fragment="script">
    <script type="text/javascript">
    </script>
</th:block>
</body>
</html>
DetailDTO
@Getter
@Setter
@Builder
public class DetailDTO {
    private Long id;
    private String title;
    private String content;
    @DateTimeFormat(pattern = "yyyy-MM-dd`T`HH:mm:ss")
    private LocalDateTime createdAt;
    @DateTimeFormat(pattern = "yyyy-MM-dd`T`HH:mm:ss")
    private LocalDateTime updatedAt;
    private int userViews;
    private int adminViews;
    private String memberName;
    private int likes;
}
BoardService
다음 메소드를 추가해준다.
DetailDTO getDetail(Long id);
BoardServiceImpl
DTO를 생성하여 컨트롤러로 반환한다.
@Override
public DetailDTO getDetail(Long id) {
    Optional<Board> board = boardRepository.findById(id);
    Board boardEntity = board.orElse(null);

    Member member = boardEntity.getMember();

    DetailDTO detailDTO = DetailDTO.builder()
            .id(boardEntity.getId())
            .title(boardEntity.getTitle())
            .content(boardEntity.getContent())
            .createdAt(boardEntity.getCreatedAt())
            .updatedAt(boardEntity.getUpdatedAt())
            .userViews(boardEntity.getUserViews())
            .adminViews(boardEntity.getAdminViews())
            .memberName(member.getName())
            .build();

    return detailDTO;
}
WebController
service단에서 반환한 dto를 Model 객체에 담는다.
@GetMapping("/{id}")
public String detail(@PathVariable Long id, Model model){

    DetailDTO post = boardService.getDetail(id);
    model.addAttribute("post", post);

    return "detail";
}
@PathVariable
주소의 일부분을 변수로 사용하고 싶을 때 사용하는 어노테이션
사용시 null이나 공백이 들어가면 안된다.
http://localhost:8086/post/123
컨트롤러에서 url 입력할때 { 변수명 } 으로 작성하고
@GetMapping("/{id}")
메소드 정의할 때 @PathVariable("변수명")
public String test(@PathVariable Long id){
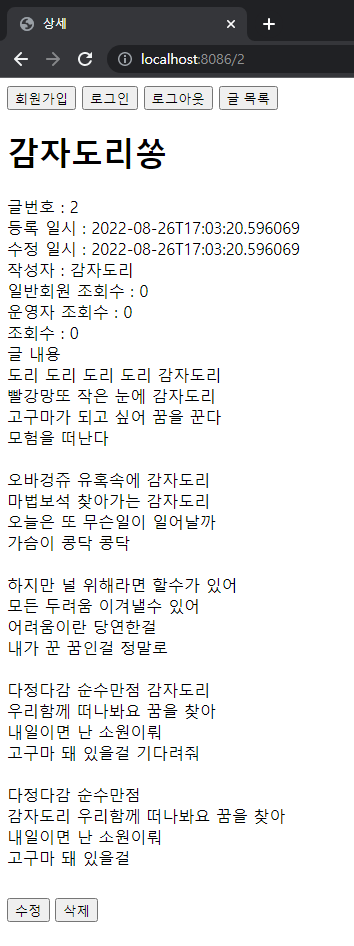
서버를 켜서 글조회를 해본다.
home.html
글 리스트에서 각 행을 클릭했을 때 view(id)함수를 실행한다.
<tr th:each="b : ${board}" th:id="${b.id}" th:onclick="view(this.getAttribute('id'))">
script에 다음 코드를 작성한다.
function view(id) {
  const path = 'http://localhost:8086/api/' + id;
}
아니면 이렇게 해도 된다.
<tr th:each="p : ${posts}" th:id="${p.id}" th:onclick="'location.href=\''+ @{/{id}(id=${p.id})} + '\''">
이제 각 화면이 연결되었으니 조회수 증가를 구현해보자.
쿠키를 이용할 것이다.
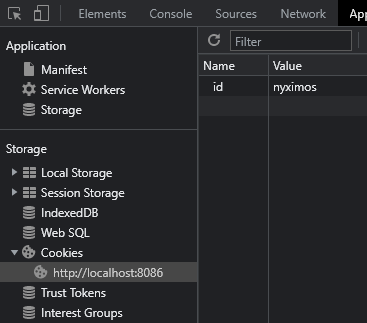
원래 로그인할 때 LocalStorage에 id를 저장했었는데, cookie에도 아이디를 할당해주자.
다음 코드를 추가한다.
document.cookie = `id=${id}`
로그인 후 쿠키를 확인해본다.
WebController
@CookieValue 애노테이션을 이용해서 쿠키를 전달 받는다.
쿠키를 받아서 포스트 아이디와 함께 서비스단에 전달해준다.
@GetMapping("/{id}")
public String detail(@PathVariable Long id, Model model, @CookieValue("id") String memberId){
    DetailDTO post = boardService.getDetail(id, memberId);
    model.addAttribute("post", post);

    return "detail";
}
BoardService
DetailDTO getDetail(Long id, String memberId);
BoardServiceImpl
@Override
public DetailDTO getDetail(Long id, String memberId) {

    Optional<Board> board = boardRepository.findById(id);
    Board boardEntity = board.orElse(null);

    Member member = boardEntity.getMember();

    if(!memberId.equals(member.getId())){
        if(member.getRole().equals(MemberRole.ADMIN)){
            boardEntity.countAdmin();
        }else {
            boardEntity.countUser();
        }
    }

    DetailDTO detailDTO = DetailDTO.builder()
            .id(boardEntity.getId())
            .title(boardEntity.getTitle())
            .content(boardEntity.getContent())
            .createdAt(boardEntity.getCreatedAt())
            .updatedAt(boardEntity.getUpdatedAt())
            .userViews(boardEntity.getUserViews())
            .adminViews(boardEntity.getAdminViews())
            .memberName(member.getName())
            .build();

    return detailDTO;
}


}
쿠키의 멤버 아이디 즉 로그인 한 아이디가 포스트 작성자 아이디와 다를때,
Role을 비교해서 Admin이면 adminViews를 1 증가하고, 일반회원이면 userViews를 1 증가해준다.
if(!memberId.equals(member.getId())){
    if(member.getRole().equals(MemberRole.ADMIN)){
        boardEntity.countAdmin();
    }else {
        boardEntity.countUser();
    }
}
Board.java
Board 엔티티에 메소드를 추가해준다.
public void countAdmin() {
    this.adminViews++;
}

public void countUser() {
    this.userViews++;
}
}
로그인 후 조회수가 증가하는지 확인해보자.
'Programming > Spring Boot' 카테고리의 다른 글
| Spring Boot + MySQL + JPA + Thymeleaf 로 CRUD 구현하기 09 글수정 (27) | 2022.09.05 |
|---|---|
| Spring Boot + MySQL + JPA + Thymeleaf 로 CRUD 구현하기 08 글 삭제 (0) | 2022.08.29 |
| Spring Boot + MySQL + JPA + Thymeleaf 로 CRUD 구현하기 06 글 등록 (0) | 2022.08.26 |
| Spring Boot + MySQL + JPA + Thymeleaf 로 CRUD 구현하기 05 로그인, 로그아웃 구현 (2) | 2022.08.16 |
| Spring Boot + MySQL + JPA + Thymeleaf 로 CRUD 구현하기 04 타임리프 레이아웃, 회원가입 구현 (5) | 2022.08.12 |

